Introduction
Download and install
Download and install Tork quickly with the steps described here.
Requirements
Make sure you have a fairly recent version of Docker installed on your system. You can download Docker from the official Docker website.
Download the Tork binary for your system from the releases page.
Installation
Create a directory:
mkdir ~/tork
cd ~/tork
Unpack the Tork binary:
tar xzvf ~/Downloads/tork_0.1.66_darwin_arm64.tgz
Run Tork:
% ./tork
If the installation is successful you should see something like this:
 _______  _______  ______    ___   _
|       ||       ||    _ |  |   | | |
|_     _||   _   ||   | ||  |   |_| |
  |   |  |  | |  ||   |_||_ |      _|
  |   |  |  |_|  ||    __  ||     |_
  |   |  |       ||   |  | ||    _  |
  |___|  |_______||___|  |_||___| |_|

 0.1.66

NAME:
   tork - a distributed workflow engine

USAGE:
   tork [global options] command [command options] [arguments...]

COMMANDS:
   run        Run Tork
   migration  Run the db migration script
   health     Perform a health check
   help, h    Shows a list of commands or help for one command

GLOBAL OPTIONS:
   --help, -h      show help
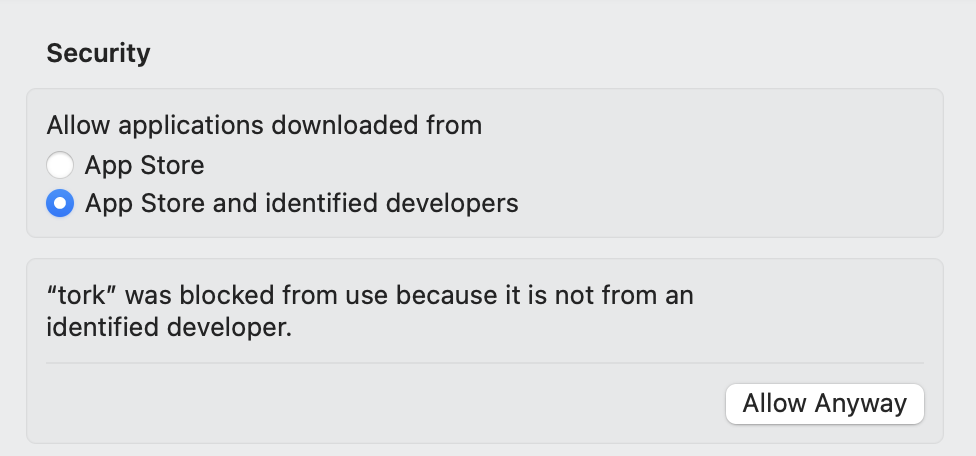
You may need to allow the binary to run on your system from your security settings:
Set up PostgreSQL
Start a PostgreSQL container
Note
For production you may want to consider using a managed PostgreSQL service for better reliability and maintenance.
docker run -d \
  --name tork-postgres \
  -p 5432:5432 \
  -e POSTGRES_PASSWORD=tork \
  -e POSTGRES_USER=tork \
  -e PGDATA=/var/lib/postgresql/data/pgdata \
  -e POSTGRES_DB=tork postgres:15.3
Run a migration to create the database schema:
TORK_DATASTORE_TYPE=postgres ./tork migration
Running Tork in Standalone mode
The easiest way to "kick the tires" is to run Tork in standalone mode. This mode is ideal when running on a single machine.
./tork run standalone
 _______  _______  ______    ___   _
|       ||       ||    _ |  |   | | |
|_     _||   _   ||   | ||  |   |_| |
  |   |  |  | |  ||   |_||_ |      _|
  |   |  |  |_|  ||    __  ||     |_
  |   |  |       ||   |  | ||    _  |
  |___|  |_______||___|  |_||___| |_|

 0.1.66

11:28AM INF starting worker ee618a38713e44da805aaebae319ab79
11:28AM DBG subscribing for tasks on x-ee618a38713e44da805aaebae319ab79
11:28AM DBG subscribing for tasks on default
11:28AM INF starting coordinator-d4d6360eda964bde84c173197a92f461
11:28AM DBG subscribing for tasks on hearbeat
11:28AM DBG subscribing for tasks on jobs
11:28AM DBG subscribing for tasks on completed
11:28AM DBG subscribing for tasks on error
11:28AM DBG subscribing for tasks on pending
11:28AM DBG subscribing for tasks on started
11:28AM INF worker listening on :8001
11:28AM INF coordinator listening on :8000
Run your first job
From another terminal, create a file named hello.yaml with the following content:
# hello.yaml
---
name: hello job
tasks:
  - name: say hello
    image: ubuntu:mantic #docker image
    run: |
      echo -n hello world
  - name: say goodbye
    image: ubuntu:mantic
    run: |
      echo -n bye world
Submit the job to Tork for execution:
JOB_ID=$(curl -s -X POST --data-binary @hello.yaml \
  -H "Content-type: text/yaml" http://localhost:8000/jobs | jq -r .id)
Query for the status of the job:
curl -s http://localhost:8000/jobs/$JOB_ID
{
  "id": "ed0dba93d262492b8cf26e6c1c4f1c98",
  "state": "COMPLETED",
  ...
}
Running in a distributed mode
The broker is responsible for routing tasks between the Coordinator and Worker nodes.
You can specify which type of broker to use using the config file.
inmemory (default) - Runs entirely in memory. Convenient for experimentation and development on a single machine.
rabbitmq - Uses RabbitMQ as the underlying implementation. Suitable for a distributed setup with 2 or more machines.
Example of running RabbitMQ:
# config.toml
[broker]
type = "rabbitmq"

[broker.rabbitmq]
url = "amqp://guest:guest@localhost:5672/"
docker run \
  -d \
  --name=tork-rabbit \
  -p 5672:5672 \
  -p 15672:15672 \
  rabbitmq:3-management
Start the Coordinator:
./tork run coordinator
Start the worker(s):
./tork run worker
Queues
By default all tasks are routed to the default queue.
All worker nodes automatically subscribe to the default queue in order to consume tasks, unless provided queue configuration.
Worker nodes can also subscribe multiple times to the same queue in order to execute N tasks in parallel. Example:
# config.toml
[worker.queues]
default = 5

[broker]
type = "rabbitmq"
./tork run worker
Will allow the worker to consume up to 5 tasks in parallel from the default queue.
It is often desirable to route tasks to different queues in order to create specialized pools of workers.
For example, one pool of workers, might be specially configured to handle video transcoding can listen to video-processing related tasks:
# config.toml
[worker.queues]
default = 5
video = 2

[broker]
type = "rabbitmq"
./tork run worker
Will allow the worker to consume up to 1 tasks in parallel from the video queue and up to 5 tasks from the default queue.
To route a task to the non-default queue, use the queue property:
name: transcode a video
queue: video
image: jrottenberg/ffmpeg:3.4-alpine
run: |
  ffmpeg \
    -i https://example.com/some/video.mov \
    output.mp4